I’ve finished the latest crochet project and for a few days now have been trying to decide what I want to do next. I started a new blanket, but I decided that’s gonna be my project to do in the couch while watching TV at night and now I’m really bored and can’t decide if I want to paint, draw, sew, bead or what else to do.
A while ago I discovered polymer clay and went crazy with it. I bought a lot of supplies, read books, watched videos, learned how to make canes,beads and a lot of things. Unfortunately, I did not feel I could master the craft, so I decided to move on the next thing…I still felt it was a fun thing to do, so I didn’t get rid of anything hoping one day i could come up with more ideas to work with using the clay.
Boredom reminded me the other day about how much I like buttons and how expensive they can get, so I decided to take everything out of the closet and make my own polymer clay buttons for a while. I figured later on, they will give me more excuses to buy yarn and crochet things and use them as decoration. 🙂 I also thought sharing this could be fun, so here I go:
Materials:
- Polymer clay (pasta machine to condition the clay, may not be needed) rolling pin (mine is a fondant roller, works perfectly fine and is half the price)
- X-acto knife, cutters, polymer clay slicer blades. Cookie cutters or fondant cutters or anything to cut shapes.
- Rubber stamps, clear stamps, anything that can create texture.
- Perfect pearls, embossing powder, acrylic paint, craft paints, (not necessary but nice to add extra color). Glitter works too.
- Yarn needle, small crochet hook or whatever to make holes.
- Buttons to use as mold and to figure out where to put holes.
- Pledge tile and vinyl floor cleaner (FUTURE POLISH) for extra shine. YES! this is what works best for me. One container goes a loooong way.
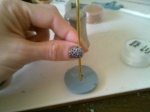
So, to start you have to condition your clay. This can be done by hand or using the machine. Having the little “pasta machine” is nice because that way you have to spend less time working the clay with your hands and you can mix colors and get an even thickness, as well as create nice color combinations and work with the slices of the canes to have an even result. I bought mine at Michaels and used a coupon, so I got it for a decent price. I think some of them are around 25 dollars or less. From what I read, some of them tend to be better than others, but for a beginner, mine works fine.
So basically, I flattened the clay and cut out the basic shape or shapes I wanted. Now comes the fun part. For the first example you can use rubber stamps to stamp the clay and then cut the shapes and make the holes. I had A LOT of fun stamping thick sheets of clay and then applying some Perfect Pearls powder. This gives the buttons AMAZING shine and color. 


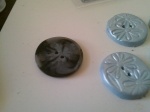

I Love love love the black clay and bronze powder combination:

You can also use paint or just use the stamps. I love going to the crafts store when the stamps are on sale, that way I can get a few instead of just one. If there are no stamps available, anything that you can press onto the clay to give texture works.

Another fun way to decorate them is using cane work. I was never able to get those perfect flowers and shapes that other people get, but I had a few leftover psychedelic canes that I tried to slice evenly. I then layered them on a thinner layer of clay. If you have a pasta machine you can run the sheet a few times to make it more even, and then use that sheet to cover your shape.


If you don’t have a pasta machine, just try to cut the slices to the same thickness and then work them into your basic shape. Then try to even it out a little and voila! I did this by hand, and looks pretty neat. 🙂


I was having too much fun with this, so since I had black and white clay available, I decided to make a couple GUNTER penguins from Adventure Time…and use them as earrings! 🙂 Cool, huh?


I finally baked everything that was ready, according to the instructions on the package. The buttons are pretty much ready now. You can sand any imperfections with a fine grit sandpaper or fix the holes with the Xacto knife. I have tried several glazes before for extra shine and as a protective coat, and after reading a lot and by my own experience this is what works best:
 I couldn’t believe it at first, but it’s great! What I do is I put a little bit in a container and dump my buttons and beads and whatever I have in it, let it get an even coat of the liquid and take them out and let them dry. If you hang them out to dry it’s even better. You can repeat this step a couple times for added shine. You can also apply the liquid with a brush, but I don’t have patience for that. If there’s any liquid left, just cover it, or otherwise it will start solidifying.
So, I hope this could serve as inspiration or help…I can answer any questions, to the best of my knowledge. I speak Spanish too. 😉 I’m also open to suggestions, as I get bored easily and would love to try new crafts and things to do. THANX!!


Feb 27, 2013 @ 11:54:17
Great buttons! I’ve been learning clay for a few months now (I can relate to your almost A.D.D. related to crafts – I like to switch projects and mediums frequently and do everything from painting & crocheting to clay & beads), and have gone a little crazy with trying different things – your canes look great! motivation for me to try a little harder to get some good combos 🙂
Feb 27, 2013 @ 13:00:03
Thank you! Glad you liked them! I was kinda frustrated because I couldn’t get FAST AND PERFECT results with canes, but hey, at least I had fun! Let’s keep crafting! And yes, I’m completely ADD! Cheers!